Lighting Sculpture
Nakyung Lee

On my mood board, there are many organic forms and abstract elements. I'm particularly interested in swirls, squiggles, and segmented shapes that define a unique design created with materials that offer rich textures or transparency, enabling light to shine through the surfaces.


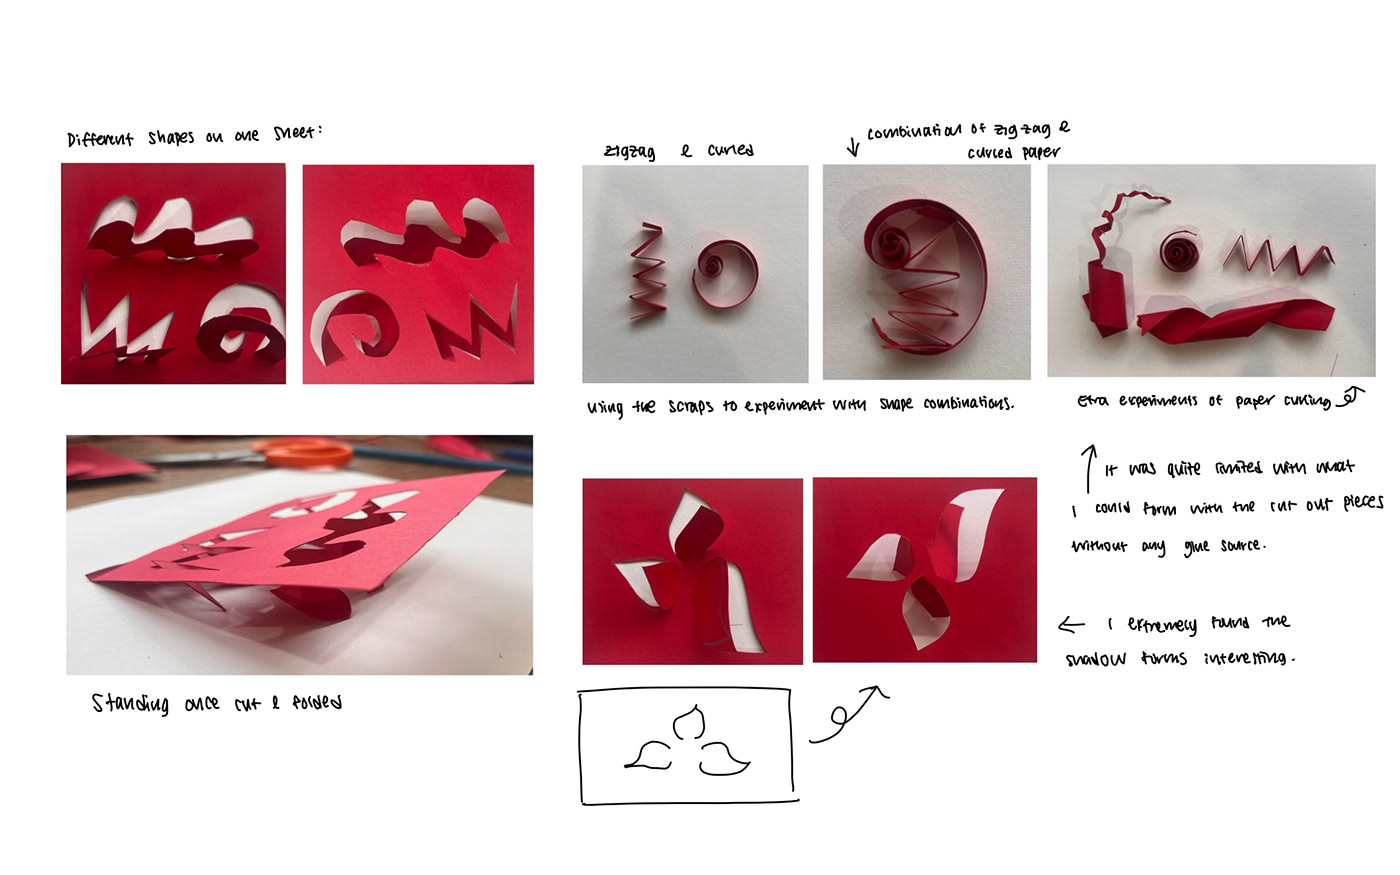
During my study of lamps, as I was interested in designs with broken up forms and pattern I wanted to incorporate another feature into my lamp. Making it multifunctional would deepen the decorative feature of the lamp and make it more than just a regular 'lamp'. I started off with the basics, simply focusing on what I can do with a singular piece of paper and a pair of scissors.

I enjoyed this experiment a lot. Particularly exploring how a single cut out shape can be formatted and laid out in many unique formations. In some views and angles, the origami would look flat whereas in other perspectives, it would look 3D. I was also interested in the different types of shadows it would create during times when I balanced the designs or lifted them up from the flat surface.
I experimented by folding, lifting, balancing, stacking and combining the kirigami, strictly restricting myself from using no other material other than the piece of paper.
It is fascinating that such a simple procedure and experiment could lead into developing a final design for my model.
Beginning of ideation
Brief summary of source of inspiration:
I visited the Oyster O3 Space, a study cafe as it was trending for students due to their interior and food.
During my journey to the cafe, I got curious why it was the cafe's name – Oyster Space. I searched the web, hoping to find more information on sources leading to its inspiration or connection. There was nothing quite direct, no personal connection, or even a story describing why it was named oyster.
I couldn't shake off the curiosity about why it was named as such. This lingering curiosity led me to explore the subject of oysters further, looking into their history as well as rich textures and shapes.
Once entering, I was expecting a bunch of ocean themed elements around, but, nothing. It looked like a regular book cafe. However, the longer I stayed and the more I pondered, I could see the subtile resemblance.
The cafe's interior feels cozy and snug, like being inside an oyster shell. It's peaceful and has unique architecture that makes you feel wrapped up, similar to being in an oyster's embrace. Just like an oyster's shell gives safety, the cafe gives a comfy place for people to chill out and enjoy their time studying or hanging out. Basically, the Oyster O3 Space feels like a calm and inviting oyster shell.
I became interested by the idea of exploring the oyster as I subconsciously already started my research. The more I thought about the concept, the more I realised its potential; from the gentle curves of an oyster's shell to its rough exterior, every aspect of its form resembled uniqueness.
It is unexpected for me to be inspired simply by the name of a trendy cafe.
With no original intention of working with the subject of an oyster, it’s interesting how a cafe’s name could spark ideas.

Beginning stages of sketches:
Getting to know the 'Oyster', focusing on the overall shape and details of the subject.
By studying the basic shapes I wanted to find sources of inspiration which can be used for my final design.


Stages of deformation and abstraction:


I don’t have many sketches of refined or finalised lamps. This is because I prefer to work with a collection of ideas and go along with the flow, being more hands on. I find it difficult to construct a model from a sketch as I tend to over complicate my ideas. My ideas drawn are often impossible to recreate with my bare hands. It is easier for me to work in the moment, cutting and creating without any restrictions. Instead, I like to look at how different objects can be formed into different shapes. How can I take apart from object and how can it be reassembled? These questions are what I take on to build my final models.
Prototype One:
Paper prototype


Reflection on Prototype One:
Prototype one is a simple yet abstract design due to the overlapping of the shapes. I had a lot of difficulty sculpting the design with paper, specifically the intersection. Prototype one, as shown in the sketches are basically two shapes combined, intersecting In the middle, kind of looking like a venn diagram. The idea is quite straight forward. Performing the intersection was extremely confusing and a frustrating process. I was unsure how to structure the parts of intersection which led me to cutting up random pieces of paper, and sticking them in places where it seemed right.
Process:
I started with two squiggly shapes, and long pieces of paper to construct the walls. In the beginning I really focused on keeping my design neat, only taping the insides of the model. The neatness did not last long as I built onto the design, the more I worked on it, the more I couldn’t reach to certain places resulting in me having to tape the outer sides of the model.
During the process I found out that scorching the paper before flexing it and attaching it to the base shape was much easier, also reduced time.
This prototype is designed to be a light box, which increases the functionality and has the ability to be placed in any angle or position.
This prototype is designed to be a light box, which increases the functionality and has the ability to be placed in any angle or position.
Prototype Two:
Paper prototype


Reflection on Prototype Two:
Working on Prototype Two was relatively straightforward compared to the first prototype. This design involves more curves, still sticking with the swirly shapes. There was no need for intricate assembly, making the process relatively smooth. I utilised scraps to layer, folding them into zigzags for structural support. Moving away from combination like prototype one, I worked with creating a design that isn't 3-dimensional. This prototype was particularly enjoyable to work on because it allowed me to experiment freely. Since it wasn't a composite design, I could repeatedly modify the format and composition.
Prototype Three:
Paper prototype
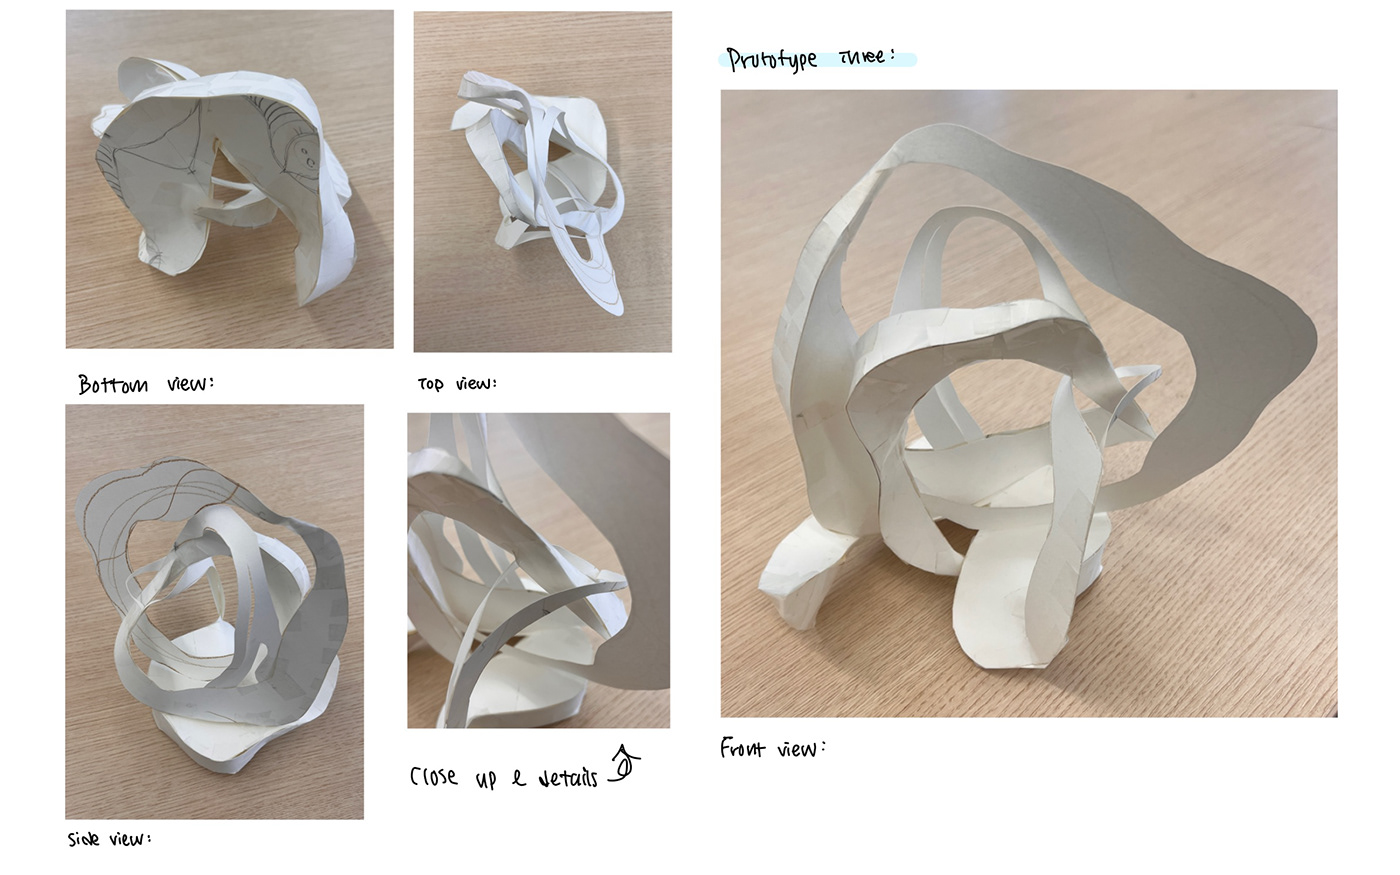
Prototype Three is a fusion of concepts from Prototype One and Prototype Two. The objective was to combine elements from both designs while staying true to the theme of the curves and swirls of the oyster. This iteration balances the three-dimensional structure of Prototype One and the flat design of Prototype Two, resulting in a cohesive and final design.
Ideas and source of inspiration for model three:

In the process of my sketch, it is shown how prototype one and two ideas have combined to create my final form of design.


Reflection on Prototype Three:
This one induced the most stress among the three paper prototypes I created. Unlike the others, I didn't have a mockup or drawing to guide me; instead, I went along with the flow, aiming to integrate swirls and convey the layered interior of an oyster, drawing inspiration from my daily surroundings. I sketched squiggles, cut them out, and pieced them together, iteratively refining the design. Throughout this process, I experimented with layout, aiming to make it look as presentable as possible while ensuring it could stand independently without any support.
I wanted the design to look more 'oyster'-like hence why there are many layers of swirls and curves.
I wanted the design to look more 'oyster'-like hence why there are many layers of swirls and curves.
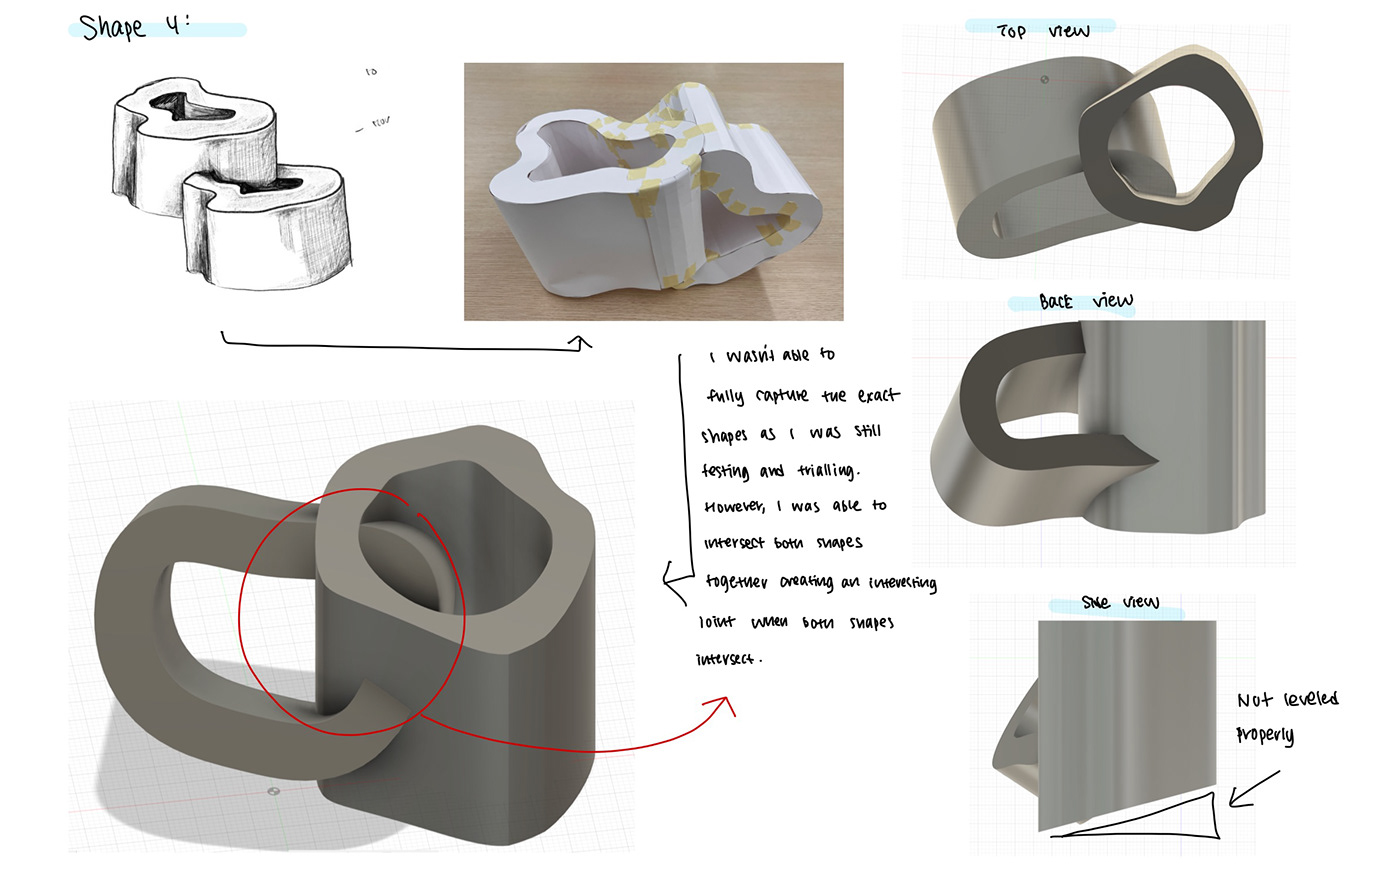
This process turned out to be more stressful than I had anticipated, and numerous challenges unfolded along the process. When it came to 3D modelling my final design, I encountered difficulties aligning the 3D model with the physical paper prototype. My lack of technique and ability to 3D model became evident, leading to moments of frustration and uncertainty. I found myself having to compromise and rethink my approach multiple times in order to make my ideas come become successful to the best of my ability.
Although my 3D model does not 100% match my paper model, it looks similar and there is a clear resemblance, which made me satisfied. However, after finishing my 3D modelling journey, I actually preferred the 3D model better than the paper model as I there were extra details I added which I couldn’t incorporate during the process of the paper prototype.
3D modelling


Overall reflection on 3D modelling:
3D modelling was so complex that I considered restarting my design and changing to laser cutting. Another peer suggested that my design be capable of laser cutting. However, I thought it would be more complex, finding out all the measurements and pulling my design apart.
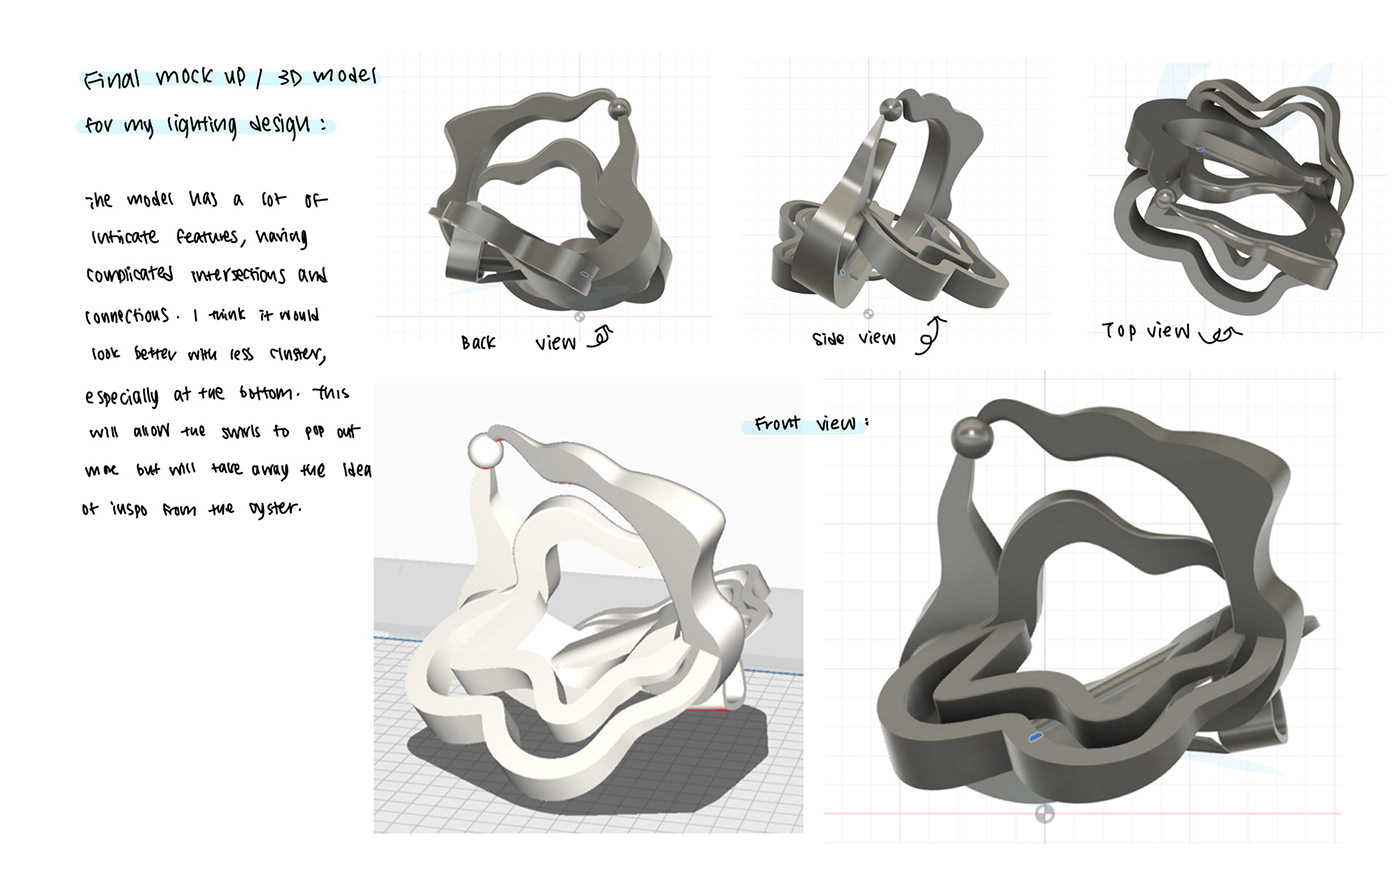
Despite watching numerous tutorials, I couldn't learn Fusion 360. I switched to Blender and Nomad Sculpt and experimented with Rhino (my experiments are attached). I asked a peer to help me mock up Shape Three. They taught me the fundamentals and simple sculpting techniques for my design. Shapes One and Two reflect my learning experiences, where I began understanding the processes involved. Shapes Three, Four, and Five represent my efforts to refine the designs, as they were potential models for final prototypes.
3D Printing Process

I was unsure of how successful my 3D print would be so as an experiment I printed one of my demo designs to test out the settings and look at sizing, the print grain, detail, etc. This 3D Print printed without any hollow space in the middle, making it quite heafty and use more filament than intended.

Final Lamp Print
Printing Process:
This is when things started to take the wrong turn. I got distracted too much with perfecting my model and completely forgot to follow the requirements of the criteria. My design didn't align with the limit of 70 grams of filament and the light reaching 170mm off the surface.
Figuring out where to place my light source was an easy solution as I just found the highest point of the design to place to light, which I referred to as the pearl of the oyster.
I wasn’t too concerned until when I put my final design into Cura. Even after changing the settings to reduce the amount of filament being used, my design had lots of hang over and hollow sections, the amount of support needed for my design was 3 times the accepted amount I could use.
I created a small demo first to see how it would print without worrying too much about the ridiculous amount of filament my design used. Once printed, I could clearly see that more filament was used on the support rather than the actual design itself.
Readapting the model to reduce support and creating alterations:


In the end, to reduce as much support as possible, I had to take apart my model, laying it flat on the surface and manually putting it together. I also deleted some sections where it was not necessary to include.
- Had to remove lots of detail, most sections apart from sections supporting the build
- Took the light off the model and printed it separately
- Had to make it skinny and tall, reducing thickness
- Thought rotating it to lay it flatter would require less but required more
Final Print Model:
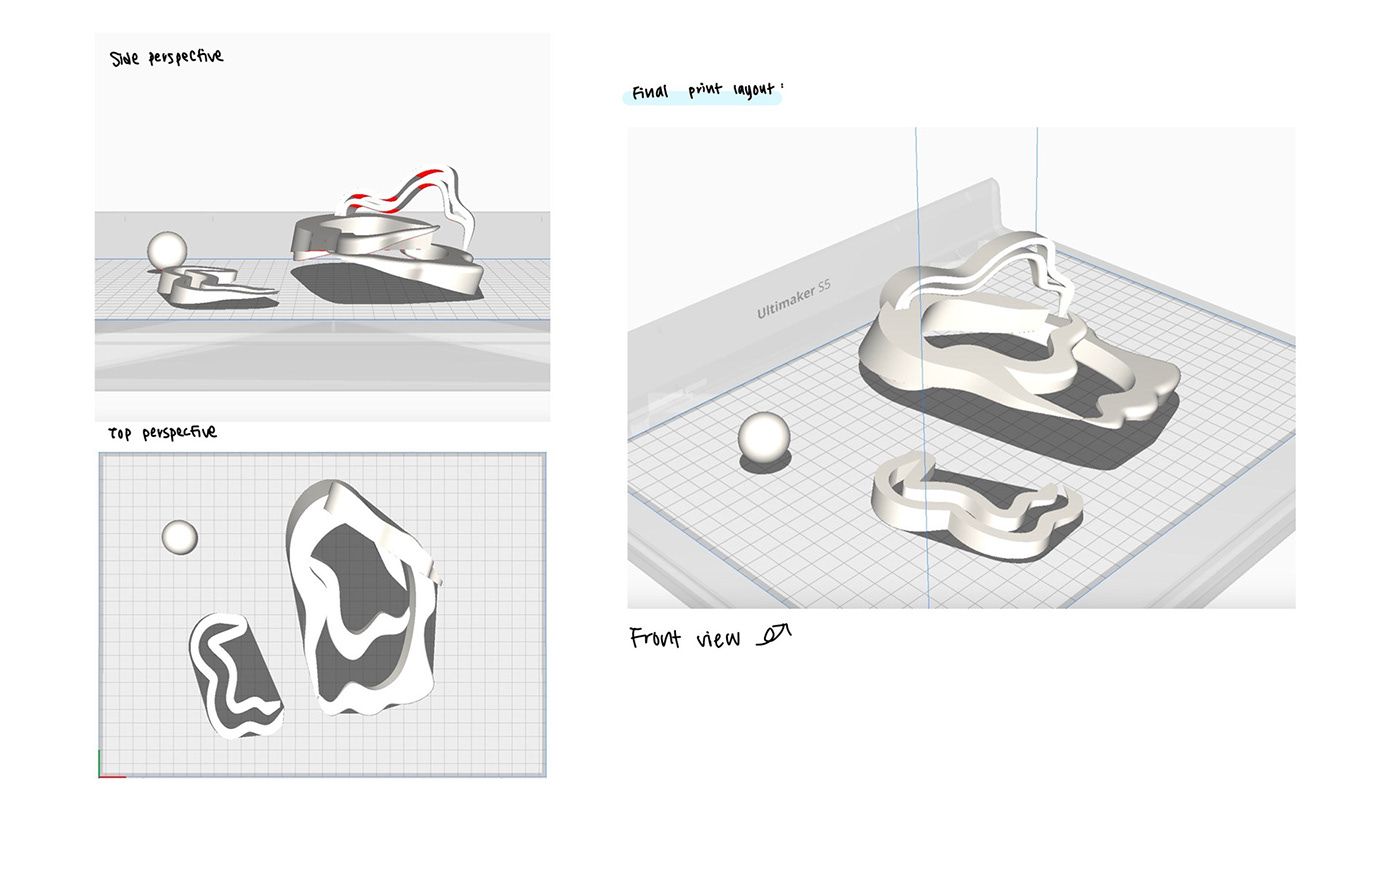
Final Lamp:
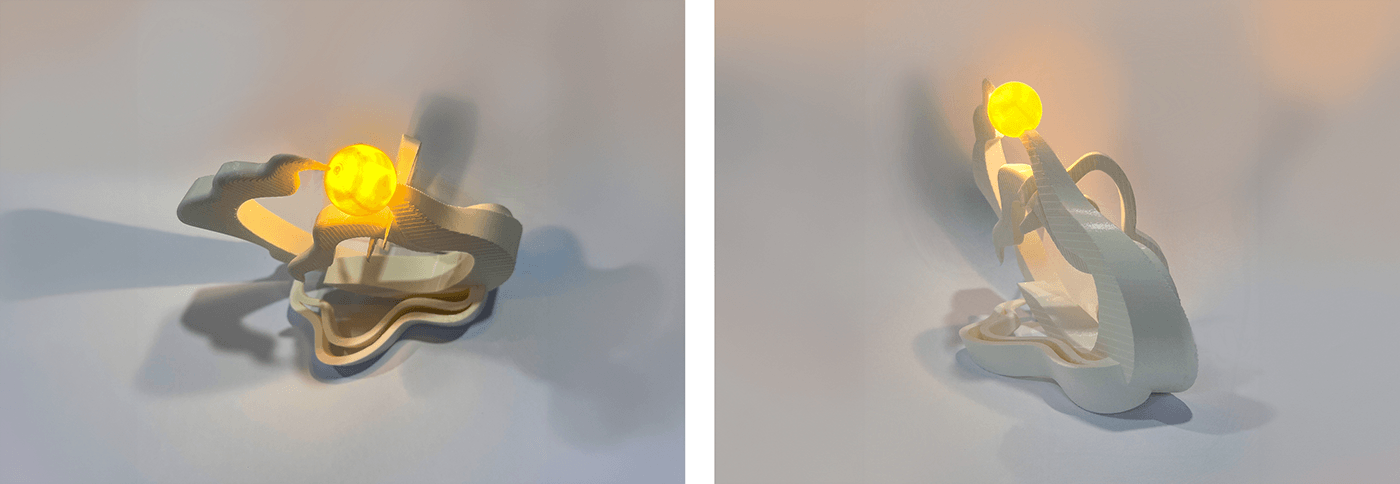

Lamp in an environment

credit to: @rocketpixel for 3D environment images
Reflection
My ideations were formed unexpectedly during my visit to the Oyster O3 Space, a cafe with a name that sparked my curiosity. As designers and artists, observing the details in everyday life is crucial because design surrounds us everywhere we go. I would like to know what experiences I might have had if I had chosen to study at a different place. Would I have been equally intrigued by their name and dug deep into its meaning as profoundly as I did with the Oyster Study Cafe? It's a thought-provoking question highlighting the importance of our surroundings and the potential for inspiration in even the most mundane places.
My ideations were formed unexpectedly during my visit to the Oyster O3 Space, a cafe with a name that sparked my curiosity. As designers and artists, observing the details in everyday life is crucial because design surrounds us everywhere we go. I would like to know what experiences I might have had if I had chosen to study at a different place. Would I have been equally intrigued by their name and dug deep into its meaning as profoundly as I did with the Oyster Study Cafe? It's a thought-provoking question highlighting the importance of our surroundings and the potential for inspiration in even the most mundane places.
The ideation process flowed smoothly, with just a few quick sketches capturing initial ideas, studies, and inspiration. It was about playing around with shapes and objects, seeing how they could change and evolve. Each round of prototyping was a challenge, but it was also a chance to experiment and refine the design further. Prototype One, in particular, showed how tough it can be to turn abstract ideas into something tangible. But all those experiments and prototypes came together to shape my final model. It might not be immediately apparent, but every little test and tweak has been incorporated into the finished product.
While I typically prefer a hands-on approach and diving right into prototyping or experiments, I realise the importance of dedicating more time to proper ideation next time around. This means spending more time brainstorming, saving inspirational photos, and jotting down notes to refine my ideas. Additionally, I recognise the necessity of executing a carefully thought-out plan for my final design. In this project, I skipped construction without paying sufficient attention to the initial planning and ideation phase. Having a solid plan in place is critical for avoiding mistakes. Rushing into modelling without careful consideration has resulted in a significant amount of time spent trying to address the issues that arose along the way.
I haven't yet been able to fully assemble my model as it has yet to be printed. However, Fabrication along the way was a big help throughout my process, giving me insights into what my model needed and how I could make it look even better. Kirigami was a real eye-opener, allowing me to play around with paper in ways I hadn't thought of before. Folding, cutting, and layering, each little tweak added an exciting element to the final design, pushing it further along the path of innovation. During my iteration process, I incorporated many of the functions and forms from the fabrication process.
I primarily used Fusion 360 for most of my iterations; as I've mentioned previously, I rushed into modelling without proper preparation, underestimating the complexity of the process, which is why so much of it was iterated on Fusion 360.
Adapting my design to meet these criteria has resulted in a more straightforward outcome than anticipated. I've come to appreciate that simplicity can often be more effective, and the resulting shape now better resembles an oyster. Although this form of iteration wasn't planned, it has certainly provided a valuable lesson for my future projects.
Throughout this process, I've constantly self-refed while receiving feedback from my peers and tutor. This project was my first experience working with 3D design and creating a sculptural model, which naturally led to numerous mistakes. However, these mistakes are valuable lessons that will inform my future projects. By applying what I have learned, I'll have better knowledge to avoid rushing through my processes and making the same errors.
I want to consider working with laser cutting, as suggested by a fellow student. Exploring alternative fabrication methods, like laser cutting, could open up new ways for experimentation while overcoming the challenges I faced with 3D printing.
Moreover, I'm keen on incorporating additional functionality, drawing from my earlier studies in lighting. This would enable greater flexibility in both movement and the alteration of form. Additionally, I'm interested in transforming my lighting model into a lightbox rather than isolating the light within the 'pearl'. This adjustment could offer an innovative twist to the design, enhancing its visual impact and functionality.
